Game Support
Updates
What is the latest version of an exA-Arcadia title
Check the patch notes page or each individual game page in the Updates section for details on the latest updates.
How to check the version of an exA-Arcadia game
On the title screen of each game, there is a version # displayed in one of the corners.
Alternatively, on the exA-Arcadia System’s game launcher menu, the version # is displayed at the bottom right-hand corner for each title.
[display screenshot of the version # on the game launcher screen]
How to update an exA-Arcadia Game Cartridge
exA-Arcadia Game Cartridges will need to be sent to a Support Center for updates.
The serial # for each game can be found on the side of the cartridge.
Send a service request via our Contact Form and include the serial # for each title.
Game Cartridge Installation & Setup
How to install an exA-Arcadia Game Cartridge
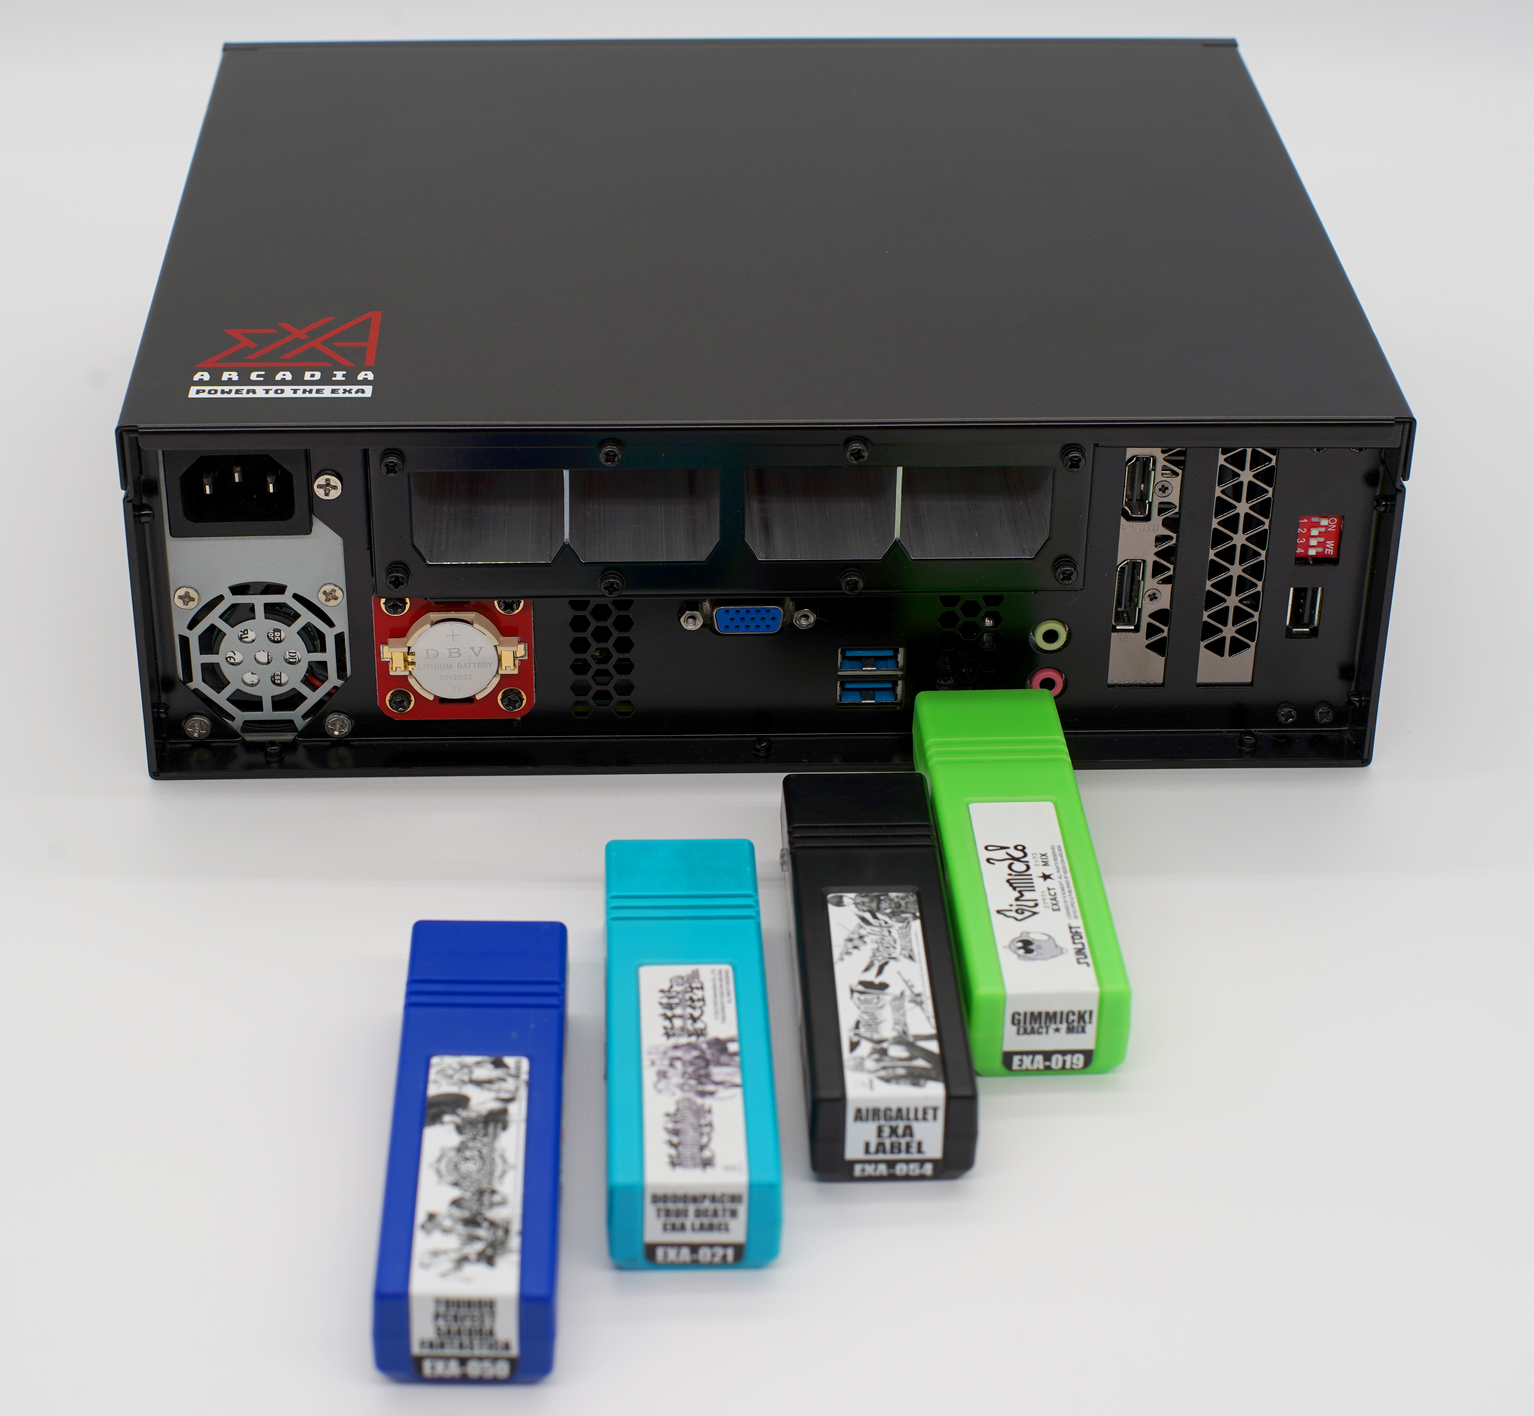
Insert the cartridge into one of the 4 cartridge slots in the exA-Arcadia system until it
locks into the cartridge slot.
The game will not automatically start when I turn on the cabinet or system
Cause
The exA-Arcadia System is not configured to automatically start games.
Resolution
To change the Auto Quit setting, turn on the exA-Arcadia System or cabinet.
Press the Test button on the game selection screen.
Navigate into the Game Selector options menu.
Change the Auto Start settings to Single. You can also optionally configure the Auto
Start timer to set when the game will launch after turning on the system or cabinet.
This is the recommended setting for cabinets with only 1 game installed.
*Note that if the Game Selector options are not displayed in the Test Menu, the exA-Arcadia System will require a firmware update.
[display screenshot of the version # on the game selector options screen]
After starting a game, it keeps going back to the game selection screen
Cause
The game is configured to automatically quit back to the game selector menu.
Resolution
To change the Auto Quit setting, start the game and press the Test button to access the
Test Menu.
In the Test Menu of each installed game, change the Auto Quit setting to off.
This is the recommended setting for cabinets with only 1 game installed.
The cartridge appears in the game selection screen but the games does not start on selection
The game cartridge will need to be sent to a Support Center for servicing.
The serial # for each game can be found on the side of the cartridge.
Send a service request via our Contact Form and include the serial #.
Game Performance
The game is stuttering or not running at full speed in 4K
Cause
The exA-Arcadia System is connected to a monitor that is refreshing at higher than 60hz.
The system is only compatible with displays that refresh at 60hz.
Resolution
Set your monitor’s refresh rate to 60hz.
For display devices that cannot be manually set to 60hz refresh rate, an EDID spoofer or
management device can be used to correct the EDID response to the exA-Arcadia System.
Refer to your monitor’s manufacturer manual for further guidance.
The game is running too fast
Cause
The exA-Arcadia System is connected to a monitor with an HDMI cable that is not HDMI 2.0 compliant</ b> and cannot output 4K60.
Resolution
Swap HDMI cables and install one that is HDMI 2.0 compliant.
The game is taking awhile to load
Cause
The game cartridge connector is not making proper contact with the exA-Arcadia System.
Resolution
Try gently cleaning the cartridge edge connector with a Q-tip and using canned air, blow out dust that may be in the cartridge slot.
For any further help, send a service request via our Contact Form.
Factory Default Settings
How to reset to factory default settings
While an exA-Arcadia game is running, press the Test button to access the Test Menu.
In each exA-Arcadia game’s Test Menu is an option to reset to factory default settings.
Select this option and confirm you want to reset to factory default settings.
*Note that this will delete all saved data including scores.
Game Settings
The game is running in Japanese
Cause
exA-Arcadia games default to the Japanese language setting.
Resolution
To change the language setting, start the game and press the Test button to access the Test Menu.
In the Test Menu of each installed game, change the language setting to English.
How to set the game to Free Play
To change the coin settings, start the game and press the Test button to access the Test
Menu.
In the Test Menu of each installed game, change the coin setting to Free Play by
either toggling through the coin settings or turning on free play.
What is the coin chute setting
Coin chutes refer to the coin mechs on each cabinet. There can be multiple coin chutes on a single cabinet or across linked cabinets.
exA-Arcadia games can be configured to count the coins/credits in each coin chute separately (Separate), per cabinet (Common – Local) or across all linked cabinets (Common – All</ b> or Linked).
To change the coin chute settings, start the game and press the Test button to access the
Test Menu.
In the Test Menu of each installed game, change the coin chute setting as desired.
What is the cabinet layout setting
Cabinet layout refers to the player positions on the cabinet control panel on a single cabinet or across linked cabinets.
exA-Arcadia games can be configured for Local and VS (back to back) cabinet setups.
On a Local configuration, players 1 and 2 will be positioned on the cabinet. For linked
cabinets, players 3 and 4, 5 and 6, 7 and 8 will be positioned on each subsequent cabinet.
On a VS configuration across linked cabinets, player 1 will be positioned on the first cabinet
and player 2 will be positioned on the second cabinet.
To change the control panel layout settings, start the game and press the Test button to access the Test Menu.
In the Test Menu of each installed game, change the layout setting as desired.
DIP Switch Settings
[display dip switch graphic from manual]
DIP 1
ON = Vertical Monitor Orientation
OFF = Horizontal Monitor Orientation
*Note that all Vertical games also support Horizontal orientation. Only some Horizontal titles support Vertical orientation.
DIP 2
ON = Force 480p SD Resolution Output
OFF = HD Resolution Video Output
*For CRT monitor usage, a separately purchased HDMI to VGA DAC (Digital Analog Converter) is required.
DIP 3
ON = Rotate the Video Output by 180 degrees
OFF = Non-rotated Video Output
*Note that this feature is only compatible with some game titles
DIP 4
Not Used
System Error Codes
I/O Error
Cause
The exA-Arcadia System cannot get a response from or is not correctly connected to a compatible JVS I/O Board.
Resolution
Ensure that the USB Type A to Type B cable used is a fully wired high quality cable and not a cable built for charging.
Compatible JVS’ I/O Boards
*These models are not compatible with the JVS protocol.
Troubleshooting for multiple cabinet configurations
All linked cabinets must be turned on simultaneously with the exA-Arcadia System.
The exA-Arcadia system boots quickly. All cabinets and correspending I/O Boards must provide a response to the system during initialization or an I/O Error message will be displayed. It is highly recommended to only install JVS’ I/O Boards for multiple cabinet installations. Standard JVS I/O Boards do not robustly support linked cabinets.
*Note that for older system models using standard JVS I/O Boards, the maximum supported length of USB cables is 5 meters between daisy chained I/O Boards. On newer system models using JVS’ I/O Boards, the maximum supported length of USB cables is 30 meters between daisy chained I/O Boards.
Error 28
Cause
The game cartridge cannot be read or is not functioning correctly.
Resolution
Try gently cleaning the cartridge edge connector with a Q-tip and using canned air, blow out dust that may be in the cartridge slot.
For any further help, send a service request via our Contact Form.
Error 29
Cause
A game cartridge was removed from the exA-Arcadia System while it was on.
Resolution
Do not hot swap, insert or remove game cartridges while the system is turned on.
Error 36
Cause
The exA-Arcadia System’s bookkeeping calendar data is out of sync.
This can occur from repeated power cycling of the system over a short period of time or a dead calendar battery.
Resolution
For the newer style exA-Arcadia system
Locate the battery on the outside of the system below the left cartridge slots. Carefully
remove the battery by lifting up from the right side taking care not to use excessive force and avoid bending the holder pins on the left side.
Replace the battery with a high quality brand CR2032 battery by inserting under the pins on the left-hand side and pushing down on the right-hand side.
Do not push the battery in over the pins on the left-hand side as this can cause damage to the system.
To reset the bookkeeping calendar data, allow the system to run for a few hours without a game cartridge inserted.
[display battery picture]
For the older style exA-Arcadia system
Send a service request via our Contact Form.
Error 37
Cause
The exA-Arcadia System’s bookkeeping calendar battery is running low.
Resolution
For the newer style exA-Arcadia system
Locate the battery on the outside of the system below the left cartridge slots. Carefully
remove the battery by lifting up from the right side taking care not to use excessive force and avoid bending the holder pins on the left side.
Replace the battery with a high quality brand CR2032 battery by inserting under the pins on the left-hand side and pushing down on the right-hand side.
Do not push the battery in over the pins on the left-hand side as this can cause damage to the system.
To reset the bookkeeping calendar data, allow the system to run for a few hours without a game cartridge inserted.
[display battery picture]
For the older style exA-Arcadia system
Send a service request via our Contact Form.
Other Error Message
For long text based error messages, send a service request via our Contact Form detailing the error message.
Request Support
Provide the serial # for each product in your request for the quickest service.